Requirements checklist
Finish the three hidden area routes before committing to the final story. An item in your inventory is a starting point, not proof that its secret is complete.
| Area | Route | Completion landmark |
|---|---|---|
| Timesville | 18 fish, Fishing Paper and Old/Lost Key → window lock → hidden sequence | Angel statue encounter |
| Misery Town | Projector Remote → map → capsule puzzles | Bowling-pin-like figure, then return |
| The Office | Telescope → telephone → stairs → seven symbol stages | Bedsheets patient encounter |
The completion landmarks come from the community all-endings guide ↗. Do not mark a whole area complete just because you picked up its key or remote.
Save preparation
Keep a separate save before each area boss if you want an earlier recovery point. Fully close the game before copying saves, and preserve your current save before restoring a backup. This is a precaution; it is not a requirement to edit game files or proof that every late-game state is recoverable.
The secrets directory connects the three routes. The Office Core Key belongs to the normal water-cooler chain; it does not replace the fish reward.
Fish and the Old Key
Use the fish checklist and clock diagram, then inspect the complete Fishing Paper to claim the key. Finish the shared-room setup, switch to windowed mode, re-enter the monochrome small room and unlock it.
Continue through the hidden Timesville scenes. In the brain-scan puzzle, align the clips by their shared theme; Viri's guide comments ↗ mention school and stalking scenes as examples. Continue to the angel encounter and follow its Enter prompt. Opening the window lock alone does not finish the area.
Projector route
Dig up the remote inside the colored-seat theater, reveal and record its map, then start from the Hands room entrance. Follow the Projector Remote walkthrough through the hidden passage and capsule puzzles to its final encounter and return.
Office telephone and waiting condition
- Bring the Telescope to the train-station entrance near the figure on the bench and the Wrench location.
- Inspect the telephone clue through it: 277-5944.
- At your Office computer, open Jobs and call the number.
- Return to the stairs near the vending machine and stand underneath/behind them for about one minute.
- In the revealed green room, interact with the virtual helmet to begin the puzzles.
The Behind Stairs guide ↗ shows the entrance and waiting spot. If nothing triggers, recheck that you called through Jobs and waited at that staircase, rather than another stairway. The wait is part of the clue; repeatedly leaving to check other rooms can interrupt the attempt.
Seven Office symbol stages
Read the instruction in the puzzle window's title bar. Symbols below are text approximations of the game's icons. Use the puzzle's confirmation button after setting a grid; use its reset control if you need to undo an attempt.
| Stage / clue | What to set |
|---|---|
1 · $4 | Make four dollar signs. |
2 · * → ^ | Replace each asterisk with an upward arrow. |
3 · swap $ and !, then ! → % | Original dollars become percent signs; original exclamation marks become dollars. Leave unrelated symbols alone. |
4 · filled-circle percent icon → ! | Change every editable tile to an exclamation mark. The clue refers to the whole layout. |
5 · #! + #^ → #% | Make the number of percent signs equal the combined number of exclamation marks and arrows. The source example has three of each on the left side of the equation, and six percent signs. |
| 6 · sad face → winking happy face | Treat the layout as a sideways face. Match the six-stage reference below, including blank editable tiles. |
7 · ^5 | Click the smiley-face icon to reveal the missing tile, then set all five tiles to upward arrows. |
Stages and visual references: Behind Stairs solved grids ↗. The Green room discussion ↗ explains the count rule in stage five. It concerns counts, not tiles physically to the left of another symbol.
Stage six reference
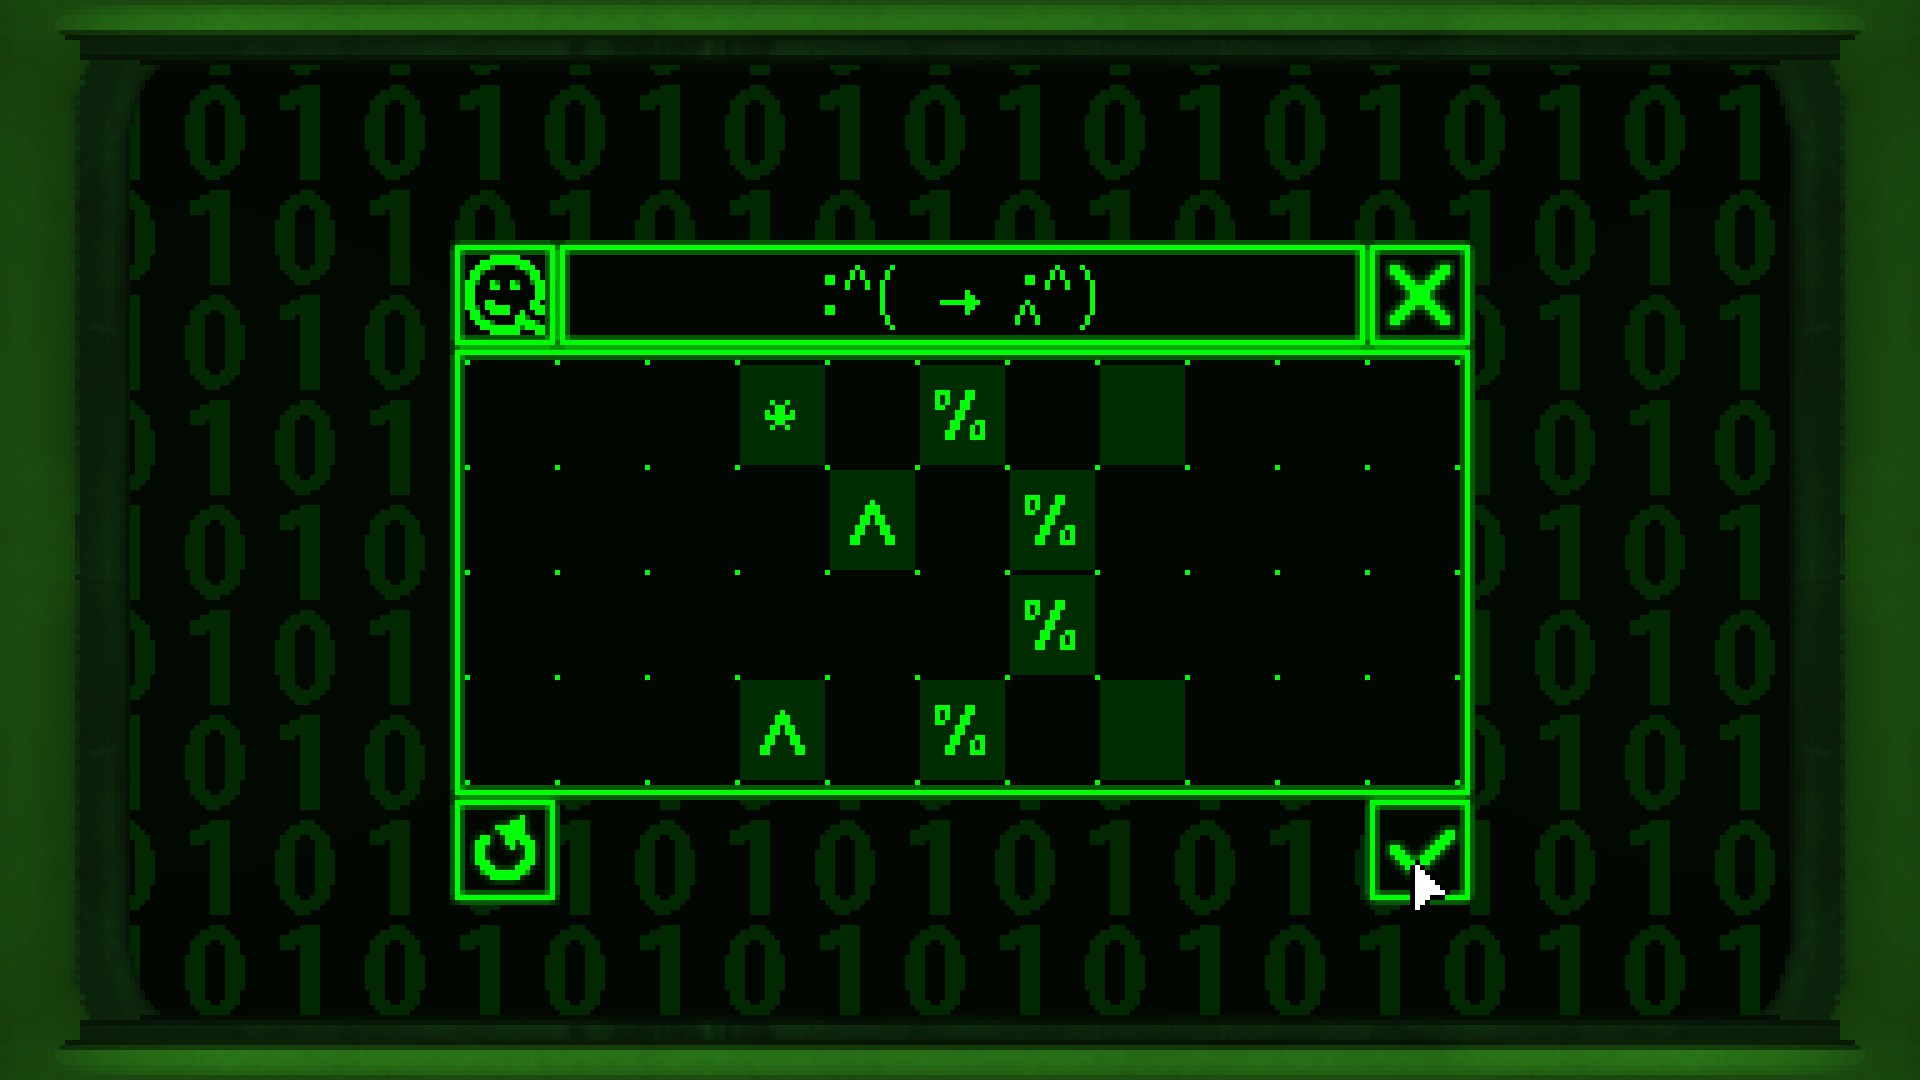
Read this matrix as rows from top to bottom. Gap means no tile exists there; blank means leave that editable tile empty. This is a transcription of the guide's sixth screenshot, not a claim that the game always starts with these symbols.
| Row | Column 1 | Column 2 | Column 3 | Column 4 | Column 5 |
|---|---|---|---|---|---|
| Top | * | Gap | % | Gap | blank |
| Second | Gap | ^ | Gap | % | Gap |
| Third | Gap | Gap | Gap | % | Gap |
| Bottom | ^ | Gap | % | Gap | blank |
If the arrangement differs in your version, compare the original sixth-stage screenshot in the guide ↗ before changing more tiles. Finish the scene after the grid sequence and check for the bedsheets patient.
If an Office symbol stage will not clear
Match the clue in your puzzle window before applying a row from the seven-stage table. The text symbols here approximate the game's icons; the original solved-grid guide ↗ is the visual reference.
| What is blocking you? | Check this before retrying |
|---|---|
| The count-rule stage does not clear | Count every percent sign, exclamation mark and arrow. Percent signs must equal exclamation marks plus arrows; this is not a left/right position rule. |
| The sideways-face stage looks almost right | Compare the stage-six matrix. A blank editable tile and a gap with no tile are different. |
| The last stage has only four tiles | Click the smiley-face icon to expose the fifth tile, then set all five to upward arrows. |
| Every grid is solved but the area seems incomplete | Continue the scene to the bedsheets patient encounter. The last grid alone is not the completion landmark. |
Final symbol sequence and commitment
After the three completion landmarks, continue the story. In Chapter III's epilogue, return to Mellow's room before taking the usual ending-door route. Look for the changed bedroom encounter, finish Overclockey's battle, then enter the wall opening and follow the book/Surgeon sequence to its conclusion.
The all-endings author ↗ reports that the saw choice does not determine this route once its secrets are complete. Other walkthroughs prescribe the toy saw. Keep a backup rather than treating that disagreement as a guaranteed lockout; our site has not independently replayed both branches.
If the bedroom is unchanged, revisit the three completion checks above. The final fight alone is not the last step: the achievement walkthrough ↗ continues through the opening, book and conversation. Do not overwrite your recovery save while diagnosing a missing encounter.
Diagnose a missing final encounter
| Last confirmed step | What to verify next |
|---|---|
| You collected the Old/Lost Key | Use it on the window lock, then finish the hidden Timesville scenes. |
| You revealed the projected map | Follow it through the passage and capsule sequence. |
| You obtained the Office Core Key | That is the normal item chain. Check the separate telephone and symbol route above. |
| You solved the Office symbols | Continue to the bedsheets patient encounter. |
| You finished all three landmarks | Compare the final bedroom sequence above before choosing the usual ending door. |
Keep a recovery save while checking an uncertain step. If your version behaves differently, report the last completed landmark and game version through Sources & corrections below.
Sources used
Where this guide was checked
Facts are rewritten and organized for this guide. Official sources are preferred for game data; community guides are used for route details.
Stages three, four and six were checked against the original screenshot guide. Ending-branch prerequisites differ between community accounts; every combination has not been tested.
- Steam all-endings guide — area completion and final route ↗
- Steam Behind Stairs guide — seven solved grids and hidden tile ↗
- Steam Green room discussion — symbol count rule ↗
- Steam achievement walkthrough — final encounter and book ↗
- Steam Timesville secret — continuation after the key ↗
Does your game behave differently?
Include the heading, game version, platform and what you expected. Source review does not mean every route was replayed on every build.
Report a correction on GitHub ↗Opens a draft public issue for you to review and submit. A GitHub account is needed. Contact details